 Have you ever painted a room in your home, stepped back, and then wondered what exactly went wrong? It all felt so right and your confidence soared as you edged, rolled, and brushed the paint on, but afterwards it looked a little, well, lacking? Professional painters make it seem easy with clean lines, smooth walls, and spotless finishes. How do they do it? Below you’ll find a few of those secrets that will get your interior painting project off to a great start.
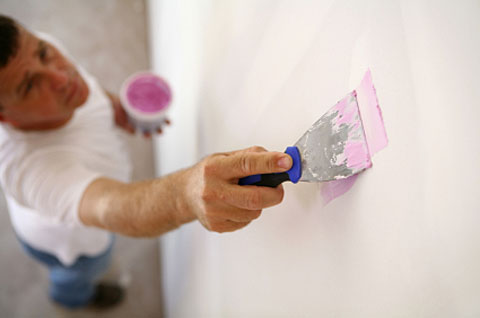
1. Patch Your Walls Before Painting
Unfortunately, as much as we all wish it worked this way, paint is not a magic elixir that covers every blemish in your walls. Dings and dents will still be there even after your bright new paint has been applied, along with issues like the holes left behind after moving a picture from one wall to another. Ask any professional painter and they will tell you that patching your walls is a hugely important step in the paint preparation process. This can be done simply with spackle and a small putty knife. Using the edge of the putty knife, fill the holes with spackle and then spread the surplus smoothly over the area.
2. A Little Sanding Goes a Long Way
As the next step in preparing for paint, carefully sand your walls from bottom to top with a very fine grit sand paper. This removes the little rough spots and burrs that develop over time, as well as flattens the ripples created by spackling the holes we talked about before. Sanding also helps provide a surface that your fresh paint will be able to grip onto easily.
3. There Is No Shame in Using Painter’s Tape
For some reason too many people see using painting tape as a sign of weakness. It is true that a lot of professional 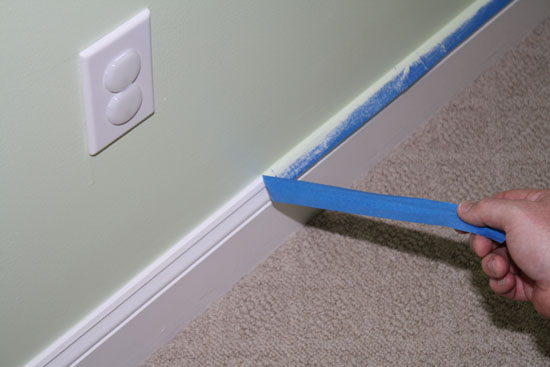 painters can create a smooth, straight line or cut in over a baseboard without using tape, but that comes from years of practice. Chances are, you might need to do some fancy paint work and you don’t have time to practice for years. Invest in a roll (or two) of blue painter’s tape. Just take the time to make sure you line it up well and push it very firmly into place so that there are no tiny gaps where paint can leak through.
4. Paint One Wall at a Time
Psychologically it can feel like you’re moving faster than you actually are when you cut in around the edges of an entire room before beginning to roll the paint onto the wall. In reality, for a smoother finish that blends well, it is better to paint one wall in its entirety at a time.
5. Tinted Primer Will Give You a Head Start
 It used to be that your option for primer consisted of white, white, or white. Now, however, you can order a primer that is tinted a similar color to the one you will be painting your walls. The beauty of this is that it provides a jump-start to the process, especially when you are painting a darker color that is likely to need more coats for complete coverage.
Read these tips if you are thinking about hiring a painting contractor.
Do You Need the Help of a Professional Painter?
If you have a painting project that you would like help with, we hope you might consider contacting us at A.G. Williams Painting Company. We offer a large variety of interior and exterior services, and have over a century of experience serving Larchmont, Bedford, Darien, and other communities throughout New York and Connecticut.